Tuesday, August 28, 2012

Building A Rockery or Rock Garden


Rock Garden
A rock garden can add an area of beautiful interest to your garden, transforming a plain garden into something stunning in no time. You usually want a space that is at least 8-10 feet by 4-6 feet for it to be worthwhile.

There are some basic rules with rockery stones though, first of all don’t steal stones from the countryside, it’s illegal. Second, don’t use broken concrete or other substituted stone as these will not be suitable. Try to use the same type of stone for the whole rockery. For a 10 x 5 foot rockery you’ll need around 1-2 tons of stone, dependant on how dense you want the stone quantity to be.

Types Of Stone

Cotswold Stone

Limestone – This stone readily weathers, so the sharp edges are lost rapidly. 

Lime hating plants may suffer if you use limestone though. We would advise against using this type of stone around any ponds too, as this will turn your water alkaline.

The colour is usually grey, but this is not always the case (Cotswold stone is a good example of a non-grey limestone).

Sandstone Rock


Sandstone – There are plenty of attractive colours available for example York Stone, although this does split easy and is very hard. 

Gloucester Red is a very nice looking brick coloured stone.


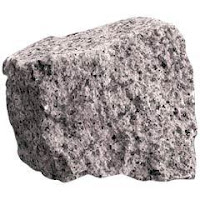
Granite Stone


Granite – A very hard and fine-grained. 

Granite is a non-porous stone and weathers very slowly, we’d advise against using this for a rockery. 

You will find granite is normally very expensive too.


Slate Rock


Slate – This rock comes in shades of grey, green or purple and is sharply cornered at first but will weather over time in your garden. 

Slate is a good choice for rockery if you can get nice pieces.


First things first, plan carefully. This is essential before you begin your rockery, remember that you want it to look as natural as you possibly can. You want to pick an area which is free from shade for most of the day for it to thrive. We also advise drawing a rough sketch too.

Next is to prepare the site. Pick a day when the soil is dry so it is easier to work with. Make sure to remove all traces of weeds or these will come back to haunt you and destroy your rock garden. Use a good weed killer if necessary before you begin, glyphosate is a brilliant product for killing weeds.

Rockery Garden
Drainage is definitely recommended, Dig down around 1 foot and fill with a layer of broken bricks and stones, rubble essentially, then add 2 inches of sand and then top soil.

Move the stones into place. Please be careful at this point, we all know someone with a bad back and we don’t want to be one of them do we? Remember, bend your knees and keep your back straight, and don’t try to lift something you aren’t strong enough to lift.

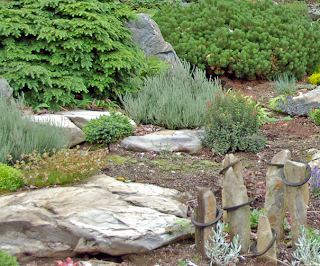
Set the stones into position. Place the stones in your desired spots, with around one third to a half below the ground, make sure fracture lines run vertically, not horizontally for a more natural look. Stand back after setting the stones to view them and see if you like the appearance.

Planting time, use larger plants sparingly, and try to plant smaller varieties in groups together. Try covering some, but not all of rock faces with carpeting plants also. You can sprinkle gravel around in between your rockery stone. 
Monday, August 27, 2012

Hozelock Bioforce Revolution

For those of you looking to build a pond, or just upgrade your filter, there's some great news! Hozelock, who are one of the leading pond equipment specialists, as we know because some of us do use their products are in the process of releasing a new filter! 

Hozelock Bioforce Revolution Pond FilterIt's going to be called the Bioforce Revolution, and it looks like it's definitely going to be a revolution in pond filtration too! There isn't much published on the filter as of yet, but we were lucky enough to find a little bit of information on the Hozelock Bioforce Revolution

It's designed to be easy cleaning, which is something we all agree is a definite plus! They have gone of the design of their original Bioforce pond filter, which has been one of the top pressurised pond filters for many years. 

Rather than just an inlet and an outlet, you now have a second outlet, which is the waste outlet, and when you are cleaning your Bioforce Revolution you would switch the flow to the waste and this will take the waste away to wherever you want to send it. (We always say feed the waste from your pond filter into your plants to give them some extra fertilization.) 

Kaldnes K3 Pond Filter Media
The new Bioforce will focus on taking full advantage of Kaldnes K3 filter media, which has a large surface area due to it's design, this houses millions and millions of colonies of beneficial bacteria, which breaks down the waste in your water, keeping your pond healthy and clean by make use of both biological and mechanical filtration.

It will also house filter foam which will be chopped up, this means the K3 media and foam will be mixed together for a better effect. The cleaning handle will stir up this media, which will remove all the excess waste, this then means that your filter does not become clogged and will work more efficiently, and it also means no more taking the filter apart, and having to clean it by hand with a bucket of pond water! 

It will also hopefully mean that beginners to ponds will not make the mistake many people do and clean their filter media out in tap water! (If you're not sure why you can't, I'll explain now...) Tap water contains chlorine, which makes it safer for us to use, the only problem is that chlorine kills all of the beneficial bacteria on your filter media, which is very bad for your pond! This also means that technically, your foams are like brand new and could take weeks, even months for the bacteria colonies to grow to a substantial enough amount to work in your pond. 

Hozelock haven't released much information about this filter as of yet, except for a small piece of information on their website, but we were lucky enough to speak with someone from Hozelock to get a better perspective on their new filter. 

They are due to be released to the public in February 2013, and are currently under going rigorous tests at Hozelocks expert testing facility in Minworth, Birmingham.

Thursday, August 23, 2012

Pre Formed Ponds

A question that often comes up is, what type of liner should I use to build my pond? Should I use rubber liner? PVC liner? Concrete or a Pre Formed Rigid pond?

A preformed pond is a rigid liner which is already molded into a shape ready to use, the only thing you need to do is dig the hole, put in the pond and fill it up (of course there is more to it than that, which we will go through soon).

What are preformed ponds made from? They can be made from different materials, the most common and cheapest is plastic, but you can also buy reinforced plastic and even fibre glass pre formed ponds. So let's go through the pro's and cons of each type first. 


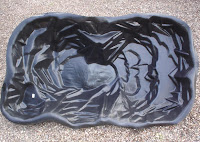
Ordinary Plastic Pre Formed Pond Ordinary Plastic Liners - These are the least expensive of the three mentioned, usually quite lightweight and slightly flexible, this makes them alot easier to transport. This also means though that they are easier to pierce and are weakened by sunlight and the corners can crack with age. You will find a lot of these liners will have simulated rock for a nice effect also. Definitely a good idea for beginners or someone on a budget.


Reinforced Plastic Pond Liners - Sometimes also called "toughline" preformed ponds, they are alot stronger than ordinary plastic pond liners, this makes them more expensive, but it is worth it if you can afford it at the time. They are heavier and less flexible which makes transport harder. These type of ponds should last between 15-20 years, but some last even longer than that.


Fibreglass Ponds - The most expensive of the three, fibreglass pre-formed ponds will not be affected by the elements because they are resistant to UV light and frost. They are much heavier than plastic ponds and do not flex at all, but if you can find transport for them it is definitely worth it, they are recognised as the best material for rigid pond construction. They should last for 20+ years. Just be careful not to damage them when transporting them as the corners are vunerable to knocks.


Once you have decided on a type of preformed pond to use, and bought it the next step is to install the pond. Incorrect installation is usually the reason that a pond will begin to leak and lose water. Follow these steps below to install your pond correctly and safely and it should last for years to come!

Step 1: Mark Out The Pond
Once you have decided where you want the pond to be, mark out the perimeter of it, and then make another line around a foot (12 inches) out from the perimeter, this will be your excavation area.
Step 2: Start Digging!
Begin your dig from the middle of where the pond will be, this will help to keep the edges intact. Dig the area 2 inches or so deeper than the pond will be, make sure to keep measuring the depth as you don't want to go too much deeper as you will have to refill and soil like this will sink and your pond will begin to sink once the water is in.
Step 3: Installation Begins
Add a layer of building sand (as it is soft) approximiately 2 inches deep. This will protect the pond where the weight is pushing down the most. Drop your preformed pond liner into the hole. Make sure the pond is level by placing a plank of straight (make sure it is straight!) wood across from edge to edge and place a spirit level on top. Once you are satisfied with this you're ready for the next step.
Step 4: Infill Around The Edges
Insert some wooden battens around the edges to hold the liner in place. Start filling the pond with your hose pipe and at the same time as this start to back fill around the edges with the excavated soil, this will make the pond sit firmly in place. Just check you have definitely filled under any marginal shelves.
Step 5: Add Your Finishing Touches
Once the pond is full of water and sitting firmly in place, you can now add your finishes to it, where it's crazy paving around the edging or gravel liner to hide the edges. Remember to seal any concrete or mortar with a sealant to prevent lime leeching into the pond, even if it's not actually in the pond, when it rains it will eventually send the pond alkaline (which we don't want!!).

You have successfully installed your liner, or you're about to. Congratulations! We hope this has helped.

Artificial Grass


Garden with artificial grass

In the UK we experience varying and unpredictable weather, and this can make maintaining a lawn a pain at times, with the wet summer we’ve just had, the grass has continued to grow, but it’s been hard to get out and cut the lawn as it’s always damp.

This is where artificial grass comes into it’s own. Having been around for quite a while, there are many styles now available. They vary a lot in the look, feel and quality and price.

So where did Artificial Grass start from?

Also known as Astro Turf, it originated in the United States and was patented by the Monsanto Company Inc. originally called “Chemgrass” and renamed in 1966 as Astro Turf.

Earlier versions of artificial grass were purely for decorative use and could not withstand sports or other uses. Later versions were built to be weather resistant and serve as a permanent outdoor artificial lawn.

Childrens Playarea with astro turfArtificial grass was slow to take off in the UK, but it has been growing in popularity in recent years and gardeners are realising the benefits of a year round maintenance free lawn.

There are many benefits to having an artificial lawn, shaded areas for example where the sunlight never gets to. Or areas which get too much sun and it becomes dry. Children’s play areas, where the lawn would get lots of use and would slowly wear away or become dangerously slippery.

Artificial grass can be laid on almost any surface, therefore you could cover an old patio or worn decking, even soil where you’ve never had a lawn before. Just make sure that your base is level.

Artificial Grass Joining Tape
Is it easy to install this lawn?

Fixing the Astroturf down can be done in different ways, it can be either adhered to a surface with a bonding agent or placed onto a surface and dressed with either sand or rubber granules which will hold it down. 

If you have 2 lengths of the grass side by side, they can be joined with joining tape to hold them together also.