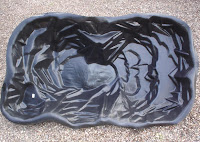
A preformed pond is a rigid liner which is already molded into a shape ready to use, the only thing you need to do is dig the hole, put in the pond and fill it up (of course there is more to it than that, which we will go through soon).
What are preformed ponds made from? They can be made from different materials, the most common and cheapest is plastic, but you can also buy reinforced plastic and even fibre glass pre formed ponds. So let's go through the pro's and cons of each type first.
 Ordinary Plastic Liners - These are the least expensive of the three mentioned, usually quite lightweight and slightly flexible, this makes them alot easier to transport. This also means though that they are easier to pierce and are weakened by sunlight and the corners can crack with age. You will find a lot of these liners will have simulated rock for a nice effect also. Definitely a good idea for beginners or someone on a budget.
Reinforced Plastic Pond Liners - Sometimes also called "toughline" preformed ponds, they are alot stronger than ordinary plastic pond liners, this makes them more expensive, but it is worth it if you can afford it at the time. They are heavier and less flexible which makes transport harder. These type of ponds should last between 15-20 years, but some last even longer than that.
 Fibreglass Ponds - The most expensive of the three, fibreglass pre-formed ponds will not be affected by the elements because they are resistant to UV light and frost. They are much heavier than plastic ponds and do not flex at all, but if you can find transport for them it is definitely worth it, they are recognised as the best material for rigid pond construction. They should last for 20+ years. Just be careful not to damage them when transporting them as the corners are vunerable to knocks.
Once you have decided on a type of preformed pond to use, and bought it the next step is to install the pond. Incorrect installation is usually the reason that a pond will begin to leak and lose water. Follow these steps below to install your pond correctly and safely and it should last for years to come!
Step 1: Mark Out The Pond
Once you have decided where you want the pond to be, mark out the perimeter of it, and then make another line around a foot (12 inches) out from the perimeter, this will be your excavation area.
Step 2: Start Digging!
Begin your dig from the middle of where the pond will be, this will help to keep the edges intact. Dig the area 2 inches or so deeper than the pond will be, make sure to keep measuring the depth as you don't want to go too much deeper as you will have to refill and soil like this will sink and your pond will begin to sink once the water is in.
Step 3: Installation Begins
Add a layer of building sand (as it is soft) approximiately 2 inches deep. This will protect the pond where the weight is pushing down the most. Drop your preformed pond liner into the hole. Make sure the pond is level by placing a plank of straight (make sure it is straight!) wood across from edge to edge and place a spirit level on top. Once you are satisfied with this you're ready for the next step.
Step 4: Infill Around The Edges
Insert some wooden battens around the edges to hold the liner in place. Start filling the pond with your hose pipe and at the same time as this start to back fill around the edges with the excavated soil, this will make the pond sit firmly in place. Just check you have definitely filled under any marginal shelves.
Step 5: Add Your Finishing Touches
Once the pond is full of water and sitting firmly in place, you can now add your finishes to it, where it's crazy paving around the edging or gravel liner to hide the edges. Remember to seal any concrete or mortar with a sealant to prevent lime leeching into the pond, even if it's not actually in the pond, when it rains it will eventually send the pond alkaline (which we don't want!!).
You have successfully installed your liner, or you're about to. Congratulations! We hope this has helped.
No comments:
Post a Comment