Showing posts with label Ponds. Show all posts

Friday, December 28, 2012

January Pond Maintenance

A common question that we're asked here at UK Gardener's Blog is what do I do with my pond during the winter, especially New Year time, so we thought it would be time to give you an idea of what to do.

The first thing you will want to do is make sure you have some sort of pond heater available if you have aquatic life in the pond. These will not heat the entire pond, so don't worry about them being costly, they will just keep a small area free from ice depending on their size and this allows for oxygen to enter the water and harmful gases to escape too.

There are many pond heaters available on the market, and we aren't going to advise a specific one, but we do advise to look out for the ones with a thermostat built in. The reason that we say this is because these heaters will switch off when they know that the water isn't frozen, so you don't need to worry about switching it on and off, especially in the UK where we seem to have ice one day and the next it could be raining.

Sludge Removal With a Pond Vacuum

The next job that can be carried out during January is to vacuum your pond, this may sound strange if you are new to ponds but bear with us, a pond vacuum works by removing silt and sludge from your pond. The most common way a pond vacuum works is by sucking through an inlet hose into it's main chamber and then running through an outlet hose which will normally have a finely netted bag to catch the debris but let you pond water run back out.

The great thing about this is that you can vacuum your pond without having to remove the water permanently as it will be going back into the pond. The reason you vacuum your pond is to remove the silt and sludge which will build up and release toxins into the water leading to water pollution and this can cause harm to your aquatic life and plants too.

Pond Pump Maintenance


The final job of this month is to get your pond pump out and give it a good service, there are plenty of how to videos out there which will show you how to do this but you will want to do the following:
  • Disconnect from the power source. This is vital, you do not want to be shocked.
  • Remove your pump from the pond.
  • Open the strainer cage, this is the cage with small holes to prevent large debris from damaging the pump.
  • Once opened, give the cage a rinse through to remove any stuck on debris or blanketweed.
  • Remove the impeller, this will usually depend on your make of pond pump, but there is normally a cap, also known as pump housing which holds the impeller in place and this will usually twist off.
  • Take out the impeller and wipe it down to remove all algae and clean inside the pump where the impeller sits too.
  • Now put the pump back together and place back into the pond and reconnect.
It's as simple as that, we advise that this kind of maintenance is carried out on your pond pump every couple of months just to ensure that it's running efficiently and will last for a lot longer too.

These are the jobs that we advise are carried out during January, of course if you'd like to there are other jobs that you can do, but these are the ones which are going to keep your pond running nicely into February and hopefully will stay that way all year round too.

Monday, November 19, 2012

Pond Winter Care


Pond Ice Prevention
It’s very important as a pond owner to be prepared for winter, especially when the freezing weather arrives as it can cause big problems if certain things are not prevented.

We always advise that you prepare in advance, that way you are preventing problems as opposed to treating problems, as catching it early can be a lot more beneficial.

First things first, remove any dead plants, during this time of year aquatic plants start to die off, and it’s extremely important that any rotting leaves or plants are removed, if not dealt with they can release harmful gases into your pond which is bad for plants, fish and other aquatic life.

If something has died off, then remove it. We also advise cutting back any plants which have thrived during the spring and summer as this will begin to die off as the sunlight is rarer and the cold sets it. Doing this will mean less work when it happens as you have already removed the bulk of it.

Use a pond vacuum or net to remove any leaves from surrounding trees and plants because if these are left in the pond then over the winter period they will rot down too, turning into silt and sludge, holding pollutants and releasing their own into the water, causing bad water quality.

To stop leaves and other debris getting into the pond in the first place, we’d advise using a pond cover net over your pond, this will catch everything before it gets into the water, making for easy removal.

Track The Temperature


Always keep a check on the temperature of your pond too, as fish should not be fed at very low temperatures. This is because their digestive system shuts down when it’s cold, so even if they do eat (which they normally won’t) the food will sit in their stomach and rot down, causing internal bacterial problems.

If food is uneaten and not removed, which is more likely the case then this can pollute the pond, leading the fish disease, so either way we advise to not feed once the temperature has gone below 5 degrees.

You can either remove your pump and filter from the pond, or raise the pump up from the bottom of the pond, this stops your from taking warmer water at the bottom and circulating it around, the fish prefer the bottom due to this slightly higher temperature.

Your Pond and Ice


Ice is something which can plague a pond during the winter, especially the last few we have experienced. Ice will trap gases in your pond, it will also prevent oxygen from getting into your pond water. If snow also falls onto this ice then your pond will also have been blocked from light entering, which means the plants you have left will die off.

Our best advice is to use a pond heater, they come in many sizes, from 150 watt to 300 watts and more, they higher the wattage the more efficient they will be at their job. They will keep a small area free from ice, this means they gases will be able to escape and your fish will have oxygen in their water to breathe!

Thursday, September 27, 2012

Hozelock Bioforce Revolution Update

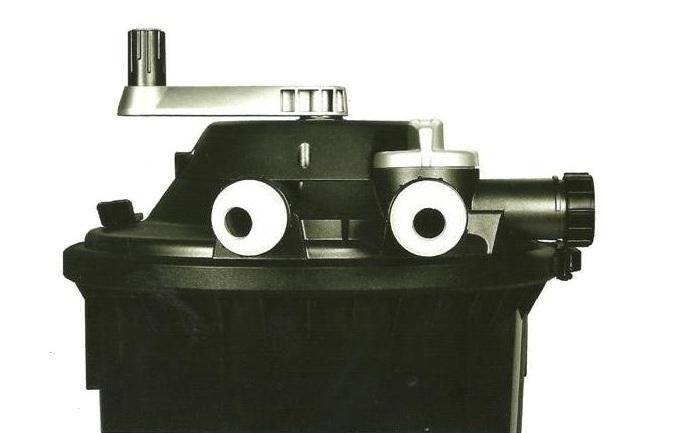
Hozelock Bioforce Revolution TopHello everyone, we just thought we would let you all know that we have discovered more information regarding the Hozelock Bioforce Revolution.

At present we have only found one company which has listed the Bioforce Revolution on their website, and they have a wide variety of information available for us to read on the product too.

They have 3 models of the revolution which are going to be available, these sizes are a 6000, 9000 and 14000. These numbers are also relevant to the volume of water that the pond filters can handle, interestingly though is that the numbers stated are what the filter can do WITH fish, which is a first. Normally you find that a pond filter will be called for example a 3000 but when you take fish and sunlight into account it can only handle half of that number, and this has how it has been for years which has always confused people, especially beginners. 

Don't worry, you are not alone, there have been plenty of people who have worked out they have 5000 litres in their pond and bought a pond filter which says it can do 5000 litres, and found out afterwards that this is without fish.

We were lucky enough to speak with someone from Hozelock who told us that they have been testing the Bioforce Revolution for a while now, and they have decided that making things more simple for the consumer was the best option all round. They have also tested these filters on ponds without fish and they can handle up to double what their figure says so for example the 14000 could handle a 28000 litre pond maximum without fish.

A Look Inside the Hozelock Bioforce RevolutionThe filtration will be a mix of mechanical and biological, by using foam cubes with the mechanical filtration which will be stirred up when using the winding handle and Kaldnes K3 media which will house millions of colonies of live bacteria which will be your biological filtration, breaking down waste in the water.

They have also started using a PLL UV Lamp in the Revolution's too, these lamps are a lot better and stronger than PLS or G8 UV lamps, so green water will be a thing of the past for your pond. The 6000 will use an 18 watt lamp, 9000 will use a 24 watt lamp and the 14000 will use a 36 watt lamp.

To coincide with the release of the Bioforce Revolutions pond filters, Hozelock are also releasing some new filters which includes the Bioforce 3000 (which can do 3000 WITH fish), which replaces the Bioforce 5500 (which can only do half that volume as per our info above)  and the Bioforce 4500 which again can do this volume with fish in the pond. These smaller Bioforce's will not have the winding handle and will use a PLS lamp as they are designed for smaller ponds.

They will also be releasing these filters as Bioforce Filter Kits which will come with a pump which is optimal to the size of the filter and better value to purchase too.

It looks like the future is bright for Bioforce pond filters with this revolutionary (excuse the pun) new design. Hopefully other manufacturers will follow Hozelock and start to brand their filters with the size it they can handle with fish. One of Hozelock's main reason for doing this is because of extensive market research, in the UK you rarely find a pond without fish, so it makes sense to brand the products with the volume of water which it can handle with fish. 

Monday, August 27, 2012

Hozelock Bioforce Revolution

For those of you looking to build a pond, or just upgrade your filter, there's some great news! Hozelock, who are one of the leading pond equipment specialists, as we know because some of us do use their products are in the process of releasing a new filter! 

Hozelock Bioforce Revolution Pond FilterIt's going to be called the Bioforce Revolution, and it looks like it's definitely going to be a revolution in pond filtration too! There isn't much published on the filter as of yet, but we were lucky enough to find a little bit of information on the Hozelock Bioforce Revolution

It's designed to be easy cleaning, which is something we all agree is a definite plus! They have gone of the design of their original Bioforce pond filter, which has been one of the top pressurised pond filters for many years. 

Rather than just an inlet and an outlet, you now have a second outlet, which is the waste outlet, and when you are cleaning your Bioforce Revolution you would switch the flow to the waste and this will take the waste away to wherever you want to send it. (We always say feed the waste from your pond filter into your plants to give them some extra fertilization.) 

Kaldnes K3 Pond Filter Media
The new Bioforce will focus on taking full advantage of Kaldnes K3 filter media, which has a large surface area due to it's design, this houses millions and millions of colonies of beneficial bacteria, which breaks down the waste in your water, keeping your pond healthy and clean by make use of both biological and mechanical filtration.

It will also house filter foam which will be chopped up, this means the K3 media and foam will be mixed together for a better effect. The cleaning handle will stir up this media, which will remove all the excess waste, this then means that your filter does not become clogged and will work more efficiently, and it also means no more taking the filter apart, and having to clean it by hand with a bucket of pond water! 

It will also hopefully mean that beginners to ponds will not make the mistake many people do and clean their filter media out in tap water! (If you're not sure why you can't, I'll explain now...) Tap water contains chlorine, which makes it safer for us to use, the only problem is that chlorine kills all of the beneficial bacteria on your filter media, which is very bad for your pond! This also means that technically, your foams are like brand new and could take weeks, even months for the bacteria colonies to grow to a substantial enough amount to work in your pond. 

Hozelock haven't released much information about this filter as of yet, except for a small piece of information on their website, but we were lucky enough to speak with someone from Hozelock to get a better perspective on their new filter. 

They are due to be released to the public in February 2013, and are currently under going rigorous tests at Hozelocks expert testing facility in Minworth, Birmingham.

Thursday, August 23, 2012

Pre Formed Ponds

A question that often comes up is, what type of liner should I use to build my pond? Should I use rubber liner? PVC liner? Concrete or a Pre Formed Rigid pond?

A preformed pond is a rigid liner which is already molded into a shape ready to use, the only thing you need to do is dig the hole, put in the pond and fill it up (of course there is more to it than that, which we will go through soon).

What are preformed ponds made from? They can be made from different materials, the most common and cheapest is plastic, but you can also buy reinforced plastic and even fibre glass pre formed ponds. So let's go through the pro's and cons of each type first. 


Ordinary Plastic Pre Formed Pond Ordinary Plastic Liners - These are the least expensive of the three mentioned, usually quite lightweight and slightly flexible, this makes them alot easier to transport. This also means though that they are easier to pierce and are weakened by sunlight and the corners can crack with age. You will find a lot of these liners will have simulated rock for a nice effect also. Definitely a good idea for beginners or someone on a budget.


Reinforced Plastic Pond Liners - Sometimes also called "toughline" preformed ponds, they are alot stronger than ordinary plastic pond liners, this makes them more expensive, but it is worth it if you can afford it at the time. They are heavier and less flexible which makes transport harder. These type of ponds should last between 15-20 years, but some last even longer than that.


Fibreglass Ponds - The most expensive of the three, fibreglass pre-formed ponds will not be affected by the elements because they are resistant to UV light and frost. They are much heavier than plastic ponds and do not flex at all, but if you can find transport for them it is definitely worth it, they are recognised as the best material for rigid pond construction. They should last for 20+ years. Just be careful not to damage them when transporting them as the corners are vunerable to knocks.


Once you have decided on a type of preformed pond to use, and bought it the next step is to install the pond. Incorrect installation is usually the reason that a pond will begin to leak and lose water. Follow these steps below to install your pond correctly and safely and it should last for years to come!

Step 1: Mark Out The Pond
Once you have decided where you want the pond to be, mark out the perimeter of it, and then make another line around a foot (12 inches) out from the perimeter, this will be your excavation area.
Step 2: Start Digging!
Begin your dig from the middle of where the pond will be, this will help to keep the edges intact. Dig the area 2 inches or so deeper than the pond will be, make sure to keep measuring the depth as you don't want to go too much deeper as you will have to refill and soil like this will sink and your pond will begin to sink once the water is in.
Step 3: Installation Begins
Add a layer of building sand (as it is soft) approximiately 2 inches deep. This will protect the pond where the weight is pushing down the most. Drop your preformed pond liner into the hole. Make sure the pond is level by placing a plank of straight (make sure it is straight!) wood across from edge to edge and place a spirit level on top. Once you are satisfied with this you're ready for the next step.
Step 4: Infill Around The Edges
Insert some wooden battens around the edges to hold the liner in place. Start filling the pond with your hose pipe and at the same time as this start to back fill around the edges with the excavated soil, this will make the pond sit firmly in place. Just check you have definitely filled under any marginal shelves.
Step 5: Add Your Finishing Touches
Once the pond is full of water and sitting firmly in place, you can now add your finishes to it, where it's crazy paving around the edging or gravel liner to hide the edges. Remember to seal any concrete or mortar with a sealant to prevent lime leeching into the pond, even if it's not actually in the pond, when it rains it will eventually send the pond alkaline (which we don't want!!).

You have successfully installed your liner, or you're about to. Congratulations! We hope this has helped.